
The Long List Option
ls Command မှာ Command Behavior ကို အပြောင်းအလဲဖြစ်စေမယ့် Options များစွာရှိပါတယ်။ အသုံးအများဆုံး Options တွေထဲက တစ်ခုကို ကြည့်ကြပါစို့။

-l Option ဟာ Long List ကိုပြပေးတာပါ။ Files နှင့် Directories တွေကို တစ်ကြောင်းစီမှာ အချက်အလက်ပြည့်ပြည့်စုံစုံဖြင့် ပြပေးမှာပါ။
| -rw-r—r– | File Type နှင့် File Permissions ကိုပြတာပါ။ |
| 1 | File ကို ညွှန်းတဲ့ Link အရေအတွက်ကိုပြတာပါ။ |
| user staff | File Ownership ပါ။ File Owner ဟာ user ဖြစ်ပြီး staff Group နှင့်လည်း ဆက်စပ်မှုရှိတာပါ။ |
| 3606 | File Size ကို Bytes ဖြင့်ဖော်ပြတာပါ။ |
| Jan 13 2017 | File ကို နောက်ဆုံးပြုပြင်ထားတဲ့ အချိန် Time Stamp ပါ။ |
| report2018.txt | File Name ပါ။ |
Ownership, Permissions နှင့် Links တွေလို Subjects တွေကို နောက်ပိုင်းတွေမှာ ပြောသွားပါမယ်။ အခုမြင်တွေ့ရသလို ls Command ရဲ့ Long List Version ဟာ ပိုမိုအသုံးများတာပါ။
Additional ls Options
ls Command မှာ အသုံးများတဲ့ နည်းလမ်းတွေထဲက တချို့ကို ဖော်ပြပါမယ်။ မိမိတို့လိုချင်တဲ့ Output ရရှိဖို့ Options တွေကို ပေါင်းစပ်အသုံးပြုနိုင်တာ တွေ့ရမှာပါ။
| ls -lh | Long List နှင့် Megabytes ဆိုလျင် (M)၊ Kilobytes ဆိုလျင် (K) ဟု ဖော်ပြပေးမယ့် ဖတ်ရလွယ်ကူမယ့် Human Readable File Sizes Format ပြပေးဖို့ပါ |
| ls -d */ | -d Option ဟာ Directories တွေကိုပဲ List လုပ်ပေးမှာဖြစ်ပြီး Content တွေကို ဖော်ပြပေးမှာမဟုတ်ပါဘူး။ */ ပါ ပါတာမို့ ဖိုင်တွေမပါတဲ့ Subdirectories တွေပဲပြမှာပါ။ |
| ls -lt | Long List ကို ပြုပြင်လိုက်တဲ့ Modification Time အရ Sorting စီပေးမယ့် Option နှင့် တွဲသုံးတာပါ။ မကြာသေးခင်က နောက်ဆုံးပြင်လိုက်တဲ့ဖိုင်တွေကို ထိပ်ဆုံးမှာပြပြီး၊ မပြောင်းဖြစ်တော့တာကြာနေတဲ့ ဖိုင်အဟောင်းတွေကို အောက်ဆုံးမှာပြမှာမျိုးပါ။ အဲ့ဒီလိုပြတာကို အောက်ပါ Reverse Option သုံးပြီး ပြောင်းပြန်ပြုလုပ်နိုင်ပါတယ်။ |
| ls -lrt | -r Reverse Option သုံးပြီး ပြောင်းပြန်ပြန်စီပေးမှာပါ။ မကြာသေးခင်က ပြောင်းလဲထားတဲ့ဖိုင်တွေဟာ List ရဲ့ အောက်နားကို ရောက်သွားမှာပါ။ Modification Time အရ စီတာအပြင် Access Time (သို့) Status Time တွေဖြင့်လည်း စီနိုင်ပါသေးတယ်။ |
| ls -lX | File eXtension အရ Sorting စီတာဖြင့် တွဲသုံးတာပါ။ ဥပမာ – (.txt) ဖြင့် အဆုံးသတ်တဲ့ဖိုင်တွေအားလုံးကို အုပ်စုဖွဲ့ပြီး ကြည့်ချင်တာမျိုး၊ (.jpg) Files တွေအားလုံး၊ စသဖြင့် ကြည့်တာမျိုးတွေပါ။ |
| ls -S | -S Option ဟာ -t (By Time) နှင့် -X (By eXtension) တို့ကဲ့သို့ပဲဖြစ်ပြီး File Size အရ စီတာပါ။ File Size အကြီးဆုံးဖြစ်တဲ့ဖိုင်တွေ အရင်ပြပြီး အငယ်ဆုံးက နောက်ဆုံးမှာမှ ပြပေးမှာပါ။ Subdirectories Contents တွေတော့ ထည့်စီပေးမှာ မဟုတ်ပါဘူး။ |
| ls -R | -R Option ဟာ Recursive List ကို ပြပေးမှာပါ။ အဲ့ဒါဘာကို ဆိုလိုတာပါလဲ။ |
Recursion in Bash
Recursion ဆိုတာ သူကိုယ်တိုင်ပြန်ညွှန်းတဲ့ အခြေအနေတစ်ခုပါ။ Computer Science မှာ အရေးပါလှတဲ့ သဘောတရားတစ်ခုလည်းဖြစ်ပေမယ့် ဒီမှာတော့ ရိုးရိုးလေးပါပဲ။ ဖော်ပြခဲ့ဖူးတဲ့ ဥပမာကို စဥ်းစားကြပါစို့။

user ဆိုတဲ့ အသုံးပြုသူမှာ home Directory တစ်ခုရှိပြီး Subdirectory တစ်ခုရှိပါတယ်။ ls Command ဟာ Location တစ်ခု Directory တစ်ခုရဲ့ Files တွေ၊ Subdirectories တွေကို ပြပေးပေမယ့် Subdirectories Contents တွေတော့ မပြောပေးနိုင်ပါဘူး။ အခုသင်ခန်းစာတွေမှာ Directories တွေရဲ့ Contents တွေ ပြလိုတဲ့အခါ tree Command သုံးထားပါတယ်။ ကံမကောင်းစွာဘဲ tree ဟာ Linux ရဲ့ Core Utilities တွေထဲက မဟုတ်တာမို့ အမြဲတော့ မရနိုင်ပါဘူး။ tree Command နှင့် ls -R Command တွေကို ဒီဥပမာတွေနှင့် ယှဥ်ကြည့်ကြရအောင်ပါ။
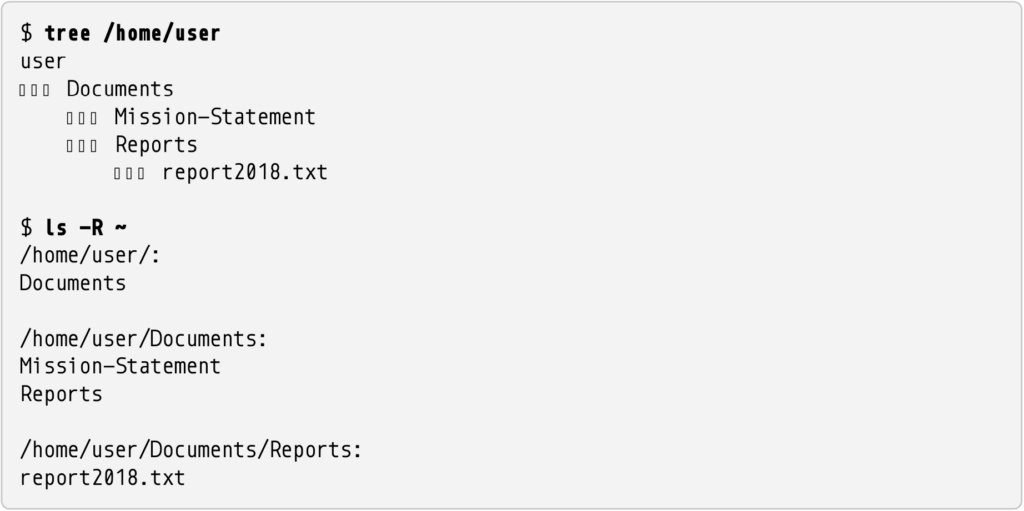
Recursive Option သုံးပြီး ပိုမိုပြည့်စုံတဲ့ Files List ရပါတယ်။ တကယ်တော့ ls Command ကို user’s Home Directory မှာ ခေါ်လိုက်တဲ့အခါ နောက်ထပ် Directory အခွဲတစ်ခု Subdirectory ကိုတွေ့တာပါ။ အဲ့ဒီ Subdirectory ထဲဝင်ပြီး ls Command ကို ထပ်ခေါ်ပါမယ်။ Mission-Statement ဆိုတဲ့ File နှင့် Reports ဆိုတဲ့ Subdirectory တစ်ခုထပ်တွေ့ပြီး အဲ့ဒီ Subdirectory ထဲဝင်ပြီး ls Command ကို တစ်ဖန်ပြန်ခေါ်မှာပါ။ အဓိကကတော့ ls -R လို့ Run လိုက်တာ ခေါ်လိုက်တာဟာ Bash ကို “ls Command ကို ဒီမှာလည်း Run ပါ၊ ထပ်တွေ့သမျှ Subdirectory တွေတိုင်းမှာလည်း ထပ်ခါ ထပ်ခါ Run ပေးပါလို့” ပြောလိုက်တာပါပဲ။
Recursion ဟာ Directories တွေ ကူးတာ (သို့) ဖျက်တာတွေလို File Modification Commands တွေမှာ အထူးသဖြင့် အရေးပါပါတယ်။ ဥပမာ – Documents ဆိုတဲ့ Subdirectory ကို ကူးချင်ခဲ့လျင် ဒီ Recursive Copy Command ကို Subdirectories တွေ အားလုံးကိုပါ ကူးပေးသွားဖို့ သုံးရမှာပါ။