Creating Directories
mkdir Command ကို Directories တွေဆောက်ဖို့ ဖန်တီးဖို့ သုံးပါတယ်။
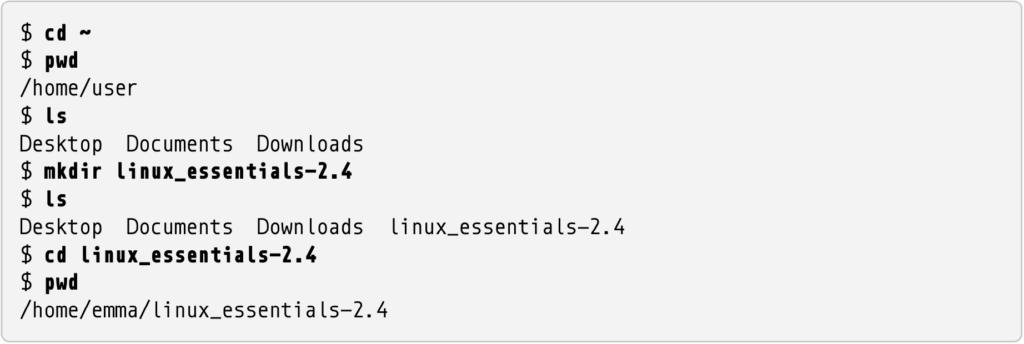
home Directory မှာ Directory အသစ်တစ်ခု ဖန်တီးကြည့်ကြပါစို့။

ဒီသင်ခန်းစာတွေထဲမှာ သုံးသမျှ Commands တွေအားလုံးကို Home Directory (သို့) သူ့အောက်က Directories အခွဲတွေ (Subdirectories) မှာ Run ပြထားတာပါ။
File System ထဲက မည်သည့်နေရာမှမဆို သင်ခန်းစာ Directory ကို လွယ်လွယ်ပြန်ရောက်ဖို့ ဒီလို Command လေး သုံးရမှာပါ။

Shell ဟာ Tilde Character (~) ကို Home Directory အဖြစ် မှတ်ယူတာပါ။ Lesson Directory ထဲမှာ လေ့ကျင့်ခန်းတွေအတွက် နောက်ထပ် Directories တွေ ထပ်ဆောက်ပါမယ်။ mkdir Command မှာ Spaces တွေခြားပြီး Directories အသစ်တွေရဲ့ အမည်တွေကို ထည့်သွားနိုင်ပါတယ်။

creating, moving, globs စတဲ့ Directories တွေကိုပဲ ဆောက်ပေးသွားပြီး Error Message ပြနေတာကို သတိပြုမိမှာပါ။ copying နှင့် deleting Directories တွေက အခုထိမရှိနေသေးပါဘူး။ mkdir Command ဟာ ပင်ကိုယ်မူလ Default အားဖြင့်တော့ မရှိနေသေးတဲ့ Directory အောက်မှာ Directory အသစ်တစ်ခုဖန်တီးခွင့်ပေးမှာ မဟုတ်ပါဘူး။ -p (သို့) –parents Option သုံးပြီး Parent Directories တွေ မရှိခဲ့လျင် တပါတည်းဆောက်ပေးဖို့ ပြောနိုင်ပါတယ်။ mkdir Command မှာ -p Option တွဲပြီး အခုလိုဖြစ်မှာပါ။

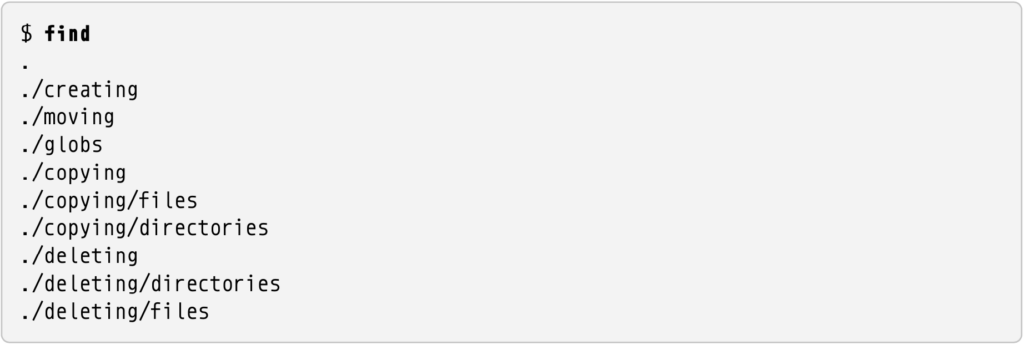
ဒီတခါမှာတော့ Error Messages ကို မတွေ့ရတော့ပါဘူး။ ဘယ် Directories တွေရှိနေပြီလဲဆိုတာ ကြည့်ကြပါစို့။

find Program ကို Files နှင့် Directories တွေ ရှာဖွေရာမှာ သုံးလေ့ရှိပေမယ့် Options တွေ မပါဘဲဆိုလျင်တော့ လက်ရှိရောက်နေတဲ့ Directory မှာရှိတဲ့ Files, Directories တွေနှင့် Subdirectories တွေ အားလုံးကို ပြပေးမှာပါ။
Tip: ls Command သုံးပြီး Directory Contents List ကြည့်ရာမှာ -t နှင့် -r Options တွေဟာ အတော်လေး အထောက်အကူဖြစ်ပါတယ်။ အချိန်အရအစီအစဥ်လိုက် ကြည့်လိုလျင် -t (Time) သုံးနိုင်ပြီး ပြောင်းပြန်ပြန်စီလိုပါက -r (Reverse) သုံးနိုင်ပါတယ်။ ပြောင်းပြန်စီလျင်တော့ အသစ်ဆုံး (အချိန်နောက်အကျဆုံး လတ်တလော ဖန်တီးထားတဲ့) ဖိုင်တွေက အောက်နားမှာဖြစ်နေမှာပါ။
Creating Files
ပုံမှန်အားဖြင့်တော့ အချက်အလက် Data တွေသိမ်းဖို့ ဖိုင်တွေကို ဖန်တီးကြပါတယ်။ ဘာမှမသိမ်းသေးဘဲ Empty File အဖြစ် touch Command သုံးပြီးလည်း ဖန်တီးနိုင်ပါတယ်။ ရှိပြီးသားဖိုင်အတွက် touch Command သုံးပြီး Run လိုက်လျင်တော့ File Content တွေပြောင်းသွားမှာမဟုတ်ဘဲ File Modification Timestamp ပဲ အပြောင်းအလဲဖြစ်ပြီး Updated Timestamp ဖြစ်သွားမှာမျိုးပါ။
Globbing အကြောင်းပြောပြဖို့ အချို့ဖိုင်တွေ ဖန်တီးကြပါမယ်နော်။

globs Directory ထဲမှ ဖိုင်တွေကို စစ်ကြည့်ကြပါစို့။

touch Command ဖြင့် ဖိုင်တွေဖန်တီးသွားတာကို သတိပြုမိမှာပါ။ Text File Content တွေကို cat Command ဖြင့် ကြည့်နိုင်ပါတယ်။ အခုလေးပဲ ဖန်တီးထားတဲ့ ဖိုင်တွေထဲက တဖိုင်ကို ကြည့်ကြပါစို့။

touch Command ဟာ Empty Files တွေဖန်တီးပေးတာမို့ ဖိုင်ထဲက Content ကို ကြည့်တဲ့အခါ ဘာမှတော့ တွေ့ရမှာမဟုတ်ပါဘူး။ Simple Text Files လေးတွေ ဖန်တီးဖို့ echo Command နှင့် > (Output Redirection) Operator လေးတွဲသုံးနိုင်တာကို ကြည့်ကြပါမယ်။

echo Command ဟာ Command Line မှာပဲ Text ကိုပြပေးတာပါ။ > Character ဟာ Command တစ်ခုရဲ့ Output ကို Terminal မှာ ပြပေးမယ့်အစား ဖိုင်ထဲကိုရေးပေးတာပါ။ echo Command ရဲ့ Output ဖြစ်တဲ့ hello ကို question15 ဆိုတဲ့ file ထဲကို ရေးပေးသွားတာပါ။ echo မှ မဟုတ်ဘဲ အခြားမည်သည့် Command နှင့်ပါမဆို တွဲသုံးနိုင်ပါတယ်။

Warning: >! ကိုတော့ သတိပြုပါ။ ရှိပြီးသားဖိုင်ထဲကို သွားရေးဖို့ အခုလို (>!) သုံးမိလျင်တော့ မူလရှိနေတာတွေပျက်သွားပြီး Overwrite ဖြစ်သွားမှာမို့ပါ။


